1) Set your computers BIOS to boot form CD / DVD
2) Insert the CentOS 6 CD or DVD
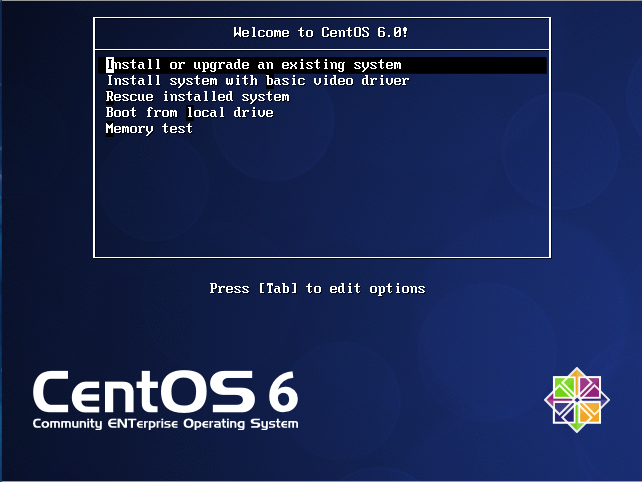
3) When presented with the following screen press enter on Install or upgrade an existing system.

4) You will now be presented with a CD Check, I always skip this step… I live life on the edge when it comes to media checking on Linux installs. However you might want to check the media.

5) You will now see some black and white text on your screen as your computer loads the X11 environment for the CentOS install, after 30 seconds or so you will be presented with the CentOS GUI installer, click next.

6) Select your Language, I am British (please no jokes about drinking tea on Twitter…) so I would select English (English).

7) Select your keyboard type

8) Storage type, as I am installing on my local hard drive I selected “Basic storage type” if you are using iSCSI or similar technology now would be the time to set it up.

9) As this is a clean install and the drive has never been formatted before I got the following Initialize drive warning, you might get the same if your drive (or virtual hard disk) is brand new.

10) Set the hostname for your Server

11) Set your timezone / location

12) Set your root password, something sensible please… Don’t set weak dictionary passwords or you will get hacked by a 13yr old russian super hackz0r… You might want to check out my guide on how to secure SSH.

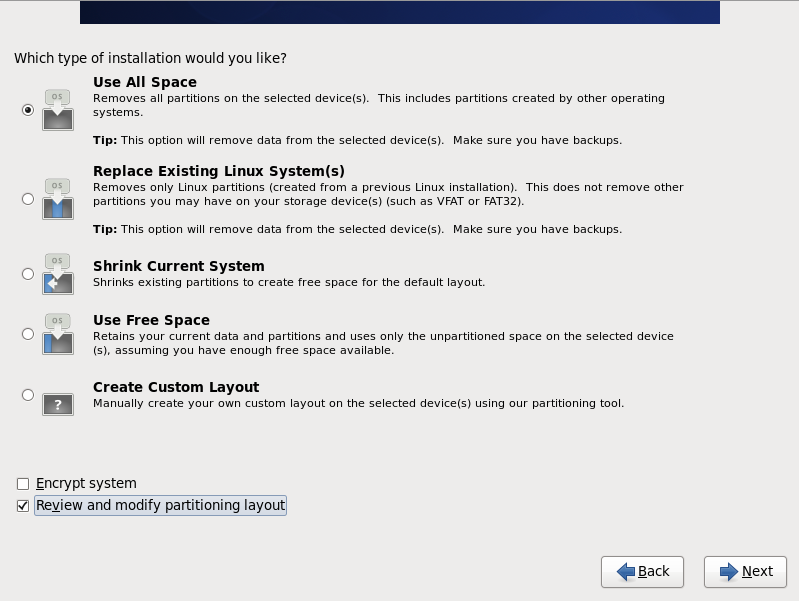
13) You will now be set with a bunch of options for your disk partitioning, as this is a new fresh install I selected the top option “Use All Space” chose the relevant option for your setup and tick the review and modify partition layout.

14) You will now see your partition table laid out, now is the time to modify it if required. If this is a server I would suggest you create some different partitions for /home and /var. These are the two partitions that crash Linux servers, /home because users fill their home drives and causes the system to crash and /var because the log or ftp directories fill up and crash the server.

15) Format warning, click on Format (this will delete your data).

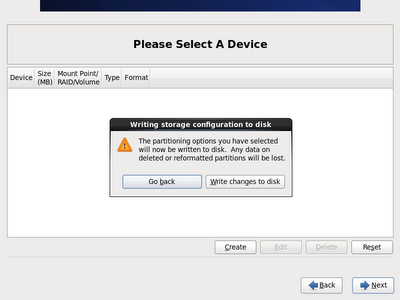
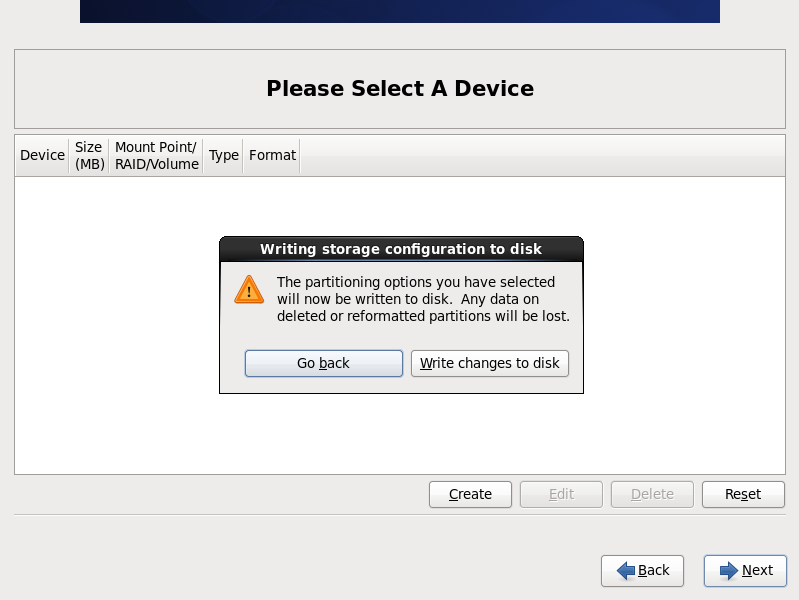
16) You will now see a warning about writing the changes to disk, click on Write changes to disk.
17) Boot loader options, I left this as default you might want to set a boot loader password.

18) The next part is important, for servers I ALWAYS select minimal, this installs a minimal setup which is ideal for servers, if you are installing for a desktop you might want to chose one of the other options. I would avoid the chose everything option as this will create a bloated system that will be more susceptible to hackers.

19) CentOS 6 will install

20) CentOS 6 has installed, congrats

21) Reboot and login as root

22) Update the system using “yum update”

Sometimes yum update doesn't work and we get error of following type
[root@centos-box ~]# yum update Loaded plugins: fastestmirror, refresh-packagekit Determining fastest mirrors Could not retrieve mirrorlist http://mirrorlist.centos.org/?release=6&arch=i386&repo=os error was 14: PYCURL ERROR 6 - "" Error: Cannot find a valid baseurl for repo: base
In this case you have to do the following:
Manually edit /etc/sysconfig/network-scripts/ifcfg-eth0 to get networking up:
[root@centos-box ~]# vi /etc/sysconfig/network-scripts/ifcfg-eth0
BOOTPROTO=dhcp
NM_CONTROLLED=no
ON_BOOT=yes
Save the file and reboot the server.
That’s it your done! Go forth and setup your server for what ever services you require, Asterisk, LAMP etc.
2) Insert the CentOS 6 CD or DVD
3) When presented with the following screen press enter on Install or upgrade an existing system.
4) You will now be presented with a CD Check, I always skip this step… I live life on the edge when it comes to media checking on Linux installs. However you might want to check the media.

5) You will now see some black and white text on your screen as your computer loads the X11 environment for the CentOS install, after 30 seconds or so you will be presented with the CentOS GUI installer, click next.

6) Select your Language, I am British (please no jokes about drinking tea on Twitter…) so I would select English (English).

7) Select your keyboard type

8) Storage type, as I am installing on my local hard drive I selected “Basic storage type” if you are using iSCSI or similar technology now would be the time to set it up.

9) As this is a clean install and the drive has never been formatted before I got the following Initialize drive warning, you might get the same if your drive (or virtual hard disk) is brand new.

10) Set the hostname for your Server

11) Set your timezone / location

12) Set your root password, something sensible please… Don’t set weak dictionary passwords or you will get hacked by a 13yr old russian super hackz0r… You might want to check out my guide on how to secure SSH.

13) You will now be set with a bunch of options for your disk partitioning, as this is a new fresh install I selected the top option “Use All Space” chose the relevant option for your setup and tick the review and modify partition layout.
14) You will now see your partition table laid out, now is the time to modify it if required. If this is a server I would suggest you create some different partitions for /home and /var. These are the two partitions that crash Linux servers, /home because users fill their home drives and causes the system to crash and /var because the log or ftp directories fill up and crash the server.

15) Format warning, click on Format (this will delete your data).

16) You will now see a warning about writing the changes to disk, click on Write changes to disk.
17) Boot loader options, I left this as default you might want to set a boot loader password.

18) The next part is important, for servers I ALWAYS select minimal, this installs a minimal setup which is ideal for servers, if you are installing for a desktop you might want to chose one of the other options. I would avoid the chose everything option as this will create a bloated system that will be more susceptible to hackers.

19) CentOS 6 will install

20) CentOS 6 has installed, congrats

21) Reboot and login as root

22) Update the system using “yum update”

Sometimes yum update doesn't work and we get error of following type
[root@centos-box ~]# yum update Loaded plugins: fastestmirror, refresh-packagekit Determining fastest mirrors Could not retrieve mirrorlist http://mirrorlist.centos.org/?release=6&arch=i386&repo=os error was 14: PYCURL ERROR 6 - "" Error: Cannot find a valid baseurl for repo: base
In this case you have to do the following:
Manually edit /etc/sysconfig/network-scripts/ifcfg-eth0 to get networking up:
[root@centos-box ~]# vi /etc/sysconfig/network-scripts/ifcfg-eth0
BOOTPROTO=dhcp
NM_CONTROLLED=no
ON_BOOT=yes
Save the file and reboot the server.
That’s it your done! Go forth and setup your server for what ever services you require, Asterisk, LAMP etc.
Comments
Post a Comment
Thanks for your valuable comments.